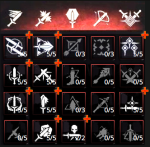
General Skills: Cat School Techniques, Griffin School Techniques, Bear School Techniques, Focus, Rage Management & Strong Back
Equipment:
Gear: Legendary Ursine, Legendary Viper Gear or Undvik gear
Min. level requirement: Level 53 + 50 Places of Power = 103 skill points
Recommended:
- Glyphs: Igni
- Glyphwords: Levity / Balance / Heft
- Runestones: –
- Runewords: Severance (Invigoration / Prolongation)
- Potions: Thunderbolt, Tawny Owl, Petri’s Philter, Blizzard, Swallow, Maribor Forest
- Decoctions: Archgriffin, Ekhidna, Ekimmara
Summary:
This is the build that I personally use for my NG+ playthrough. It has everything that I could ask for to keep the gaming experience interesting and variable. The best part is that I can change the build for three (3) different variants depending on the situation I’m going to face without the need of respec. This is possible because of two factors:
- Doubled amount of skill points available on NG+ (Places of Power offer 25 skill points again + all level-up skill points)
- Ability to have multiple armors with different Glyphwords in your inventory or stash
One big factor in NG+ is that you already know what is coming up, so you can always change your active skills, armor and potions accordingly. This lets you feel like a true Witcher!
How it works:
This section is going to be a bit different from my standard structure. Because this build has three (3) different variants for active skills, this section is now divided in three.
1. Fast -variant / 2. Igni -variant / 3. Strong -variant
General information:
- There are 5 skills that always remain in every variant
- Resolve & Razor Focus
- Every variant relies on adrenaline points, so these two skills are the most important skills to have
- Acquired Tolerance, Refreshment & Synergy
- Acquired Tolerance allows the better usage of potions and decoctions
- Refreshment is my favorite skill, allowing me to use different potions than Swallow in quick selection slots
- Synergy just makes every build stronger and always worth one active skill slot
- Furthermore, there is always one of the Witcher School Technique -skills active
- These skills offer so large buffs to damage/stats that they are impossible to pass by!
- Change your armor for every variant!
- This requires quite a lot of crowns and crafting materials, but you should craft…
- 2-3 Legendary Ursine armors, with Levity / Balance / (Heft) -glyphwords
- 3 Legendary Viper armors, with Levity / Balance / Heft -glyphwords
- Pros and Cons of…
- Legendary Ursine gear gives greater adrenaline gain and higher damage resistance to monsters, but vulnerable to poison and lower stats…
- Legendary Viper gear gives greater stats (especially for swords) and immunity to poison, but lacks in damage resistance and doesn’t offer adrenaline gain…
- But even though both have weaknesses, they can be compensated with right potions and active skills!
- Always use Nilfgaardian Guardsman Gauntlets instead of Witcher gear!
- Adds +50% Critical hit damage bonus!!!
- It should be totally clear, but just to be sure:
- Use the armor w/ Levity when using Fast -variant
- Use the armor w/ Balance when using Igni -variant
- Use the armor w/ Heft when using Strong -variant
- Sometimes I use Undvik armor when questing in Skellige just for aesthetics!
- Swords are generally the same, with little differences…
- Viper swords have higher damage output and chance to poison
- Ursine swords have lower damage output but gives great boost to adrenaline gain
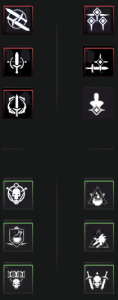
- Final note: The builds can always be modified with the inactive skills if you find them useful for the situation you are in!
- Delusion – for better conversation options (I have it nearly always equipped in quests including humans)
- Deadly Precision – sometimes combined with Fast -variant
- Strong Back -skill is one of best convenience skills to have while traveling! Replace of of your active skills with this if your inventory space is full and you just don’t feel like going to sell everything you have scavenged yet
- Protective Coating makes you a real tank taking almost no damage at all
- Fast Metabolism is sometimes used to stack many Decoctions before a fight to get that toxicity low enough to still use potions
- Rage Management is sometimes used in Strong -variant if you really need to use Quen-Slash-Retreat -tactic
- Exploding Shield, Poisoned Blades and Heightened Tolerance have rarely found use when using this build…
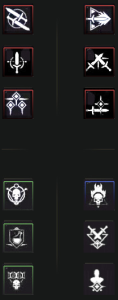
Fast -variant
- Used when dealing with large groups of enemies, or when the enemy is too agile to use strong attacks
- Whirl is the main damage dealer
- Skills that buff damage output: Cat School Techniques, Killing Spree, Hunter Instinct and general fast attack skills
- Use potions like Thunderbolt, Tawny Owl, Maribor Forest and Blizzard
- The best decoction for this variant is Ekimmara decoction
- Always remember to use right Blade Oils, because they are crucial/easy buffs to damage!
- Fixative is used for convenience reasons – I don’t like to pause the fight just to add more oil to my blade…
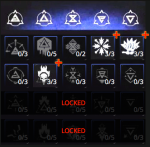
Igni -variant
- Used when facing enemies susceptible to burning, but mainly used just when wanting to mix things up and make some greater use of signs!
- Whirl and Rend is removed to get rid off the chance of losing adrenaline points
- Sign intensity is generally low but to compensate that use…
- Griffin School Techniques and Focus
- Potions like Petri’s Philter, Tawny Owl and Blizzard
- The best decoction for this variant is Ekhidna decoction
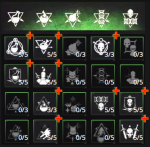
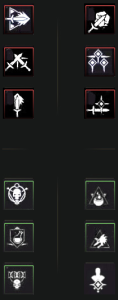
Strong -variant
- Used when dealing with a boss-fight or when dealing with generally slow enemies
- Note how Killing Spree is replaced with Sunder Armor, changing the focus from multiple enemies to single one
- Rend is your “one blow to kill them all”
- Damage is buffed by every Strong attack skill, Hunter Instinct and Bear School Techniques
- Further increase the damage with Thunderbolt and Maribor Forest
- The best decoction for this variant is Archgriffin decoction
- Stong -variant has also the option to become a tank!
- Bear School Tecniques and Full Moon -potion to increase vitality
- Equip Protective Coating and combine it with Ursine/Undvik gear to heighten damage resistance to insane levels
Pros and Cons:
+Variability at its highest level
+Every variant is usable
+Has nearly everything you can ask for (lacking some signs)
-Lack of signs
-Requires quite a bit of work to reach


